
How To Polish Rocks – The First Steps Before The Actual Grinding
Over the years, I have learned simple and easy, but very important, tips, tricks, and details that come in handy when learning how to polish rocks in a rock tumbler. Today, we’re going to go over the preliminary steps and find out a few important things to look for that can make or break your final batch of polished stones.
Table of Contents
- 1 How To Polish Rocks – The First Steps Before The Actual Grinding
- 2 Hardness Of The Stones
- 3 Types of Rocks To Tumble
- 4 Size Up The Stones
- 5 Washing The Stones
- 6 Inspecting the Rocks Prior to Tumbling
- 7 Write Down Your Data
- 8 The Next Step – The Rough Grind
- 8.1 The First Grind Towards A Polished Stone
- 8.2 Filling The Tumbler And Adding The Rock Tumbling Grit
- 8.3 Using Filler Media In Your Rock Tumbler
- 8.4 Cranking Up Your Rock Tumbler
- 8.5 Troubleshooting Your Stones’ Rough Grind
- 8.6 Warning – Disposing Of Rock Tumbler Grit Slurry
- 8.7 Post Rough Grind Cleaning
- 9 One Of The Most Important Rock Tumbling Steps
- 10 Keeping Your Tumbler Full
- 11 How To Polish Rocks – Using a Double Tumbler
- 12 After the Medium Grind
- 13 Examples Of Stone Issues To Watch Out For
- 14 Get Ready To Put A Fine Grind On Your Stones
- 15 The Rock Polishing Home Stretch
- 16 Polishing and Burnishing Gem Stones
- 17 Burnishing – When Do You Need It?
There are 4 things you will be doing when polishing rocks in a rock tumbler –
- Rough Grinding
- Medium Grinding
- Fine Grinding
- Polishing
Further still, if you want professional looking results, you may even need to split the last step into two polishing stages (burnishing).
Hardness Of The Stones
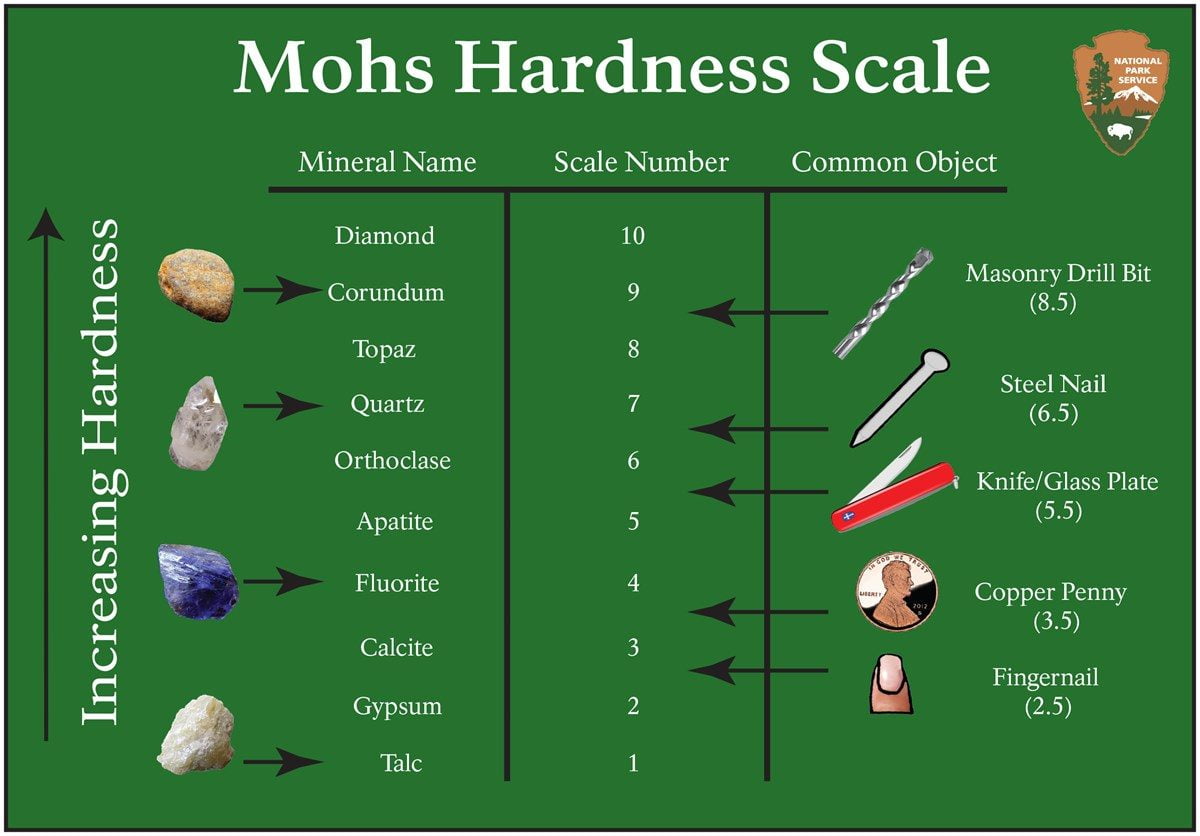
Before you jump right into tumbling the stones, you have to get them ready for the process. This involves some steps such as sorting and preparing the rocks. All stones will need to be separated according to their hardness level. Of course, they don’t have to be exactly the same hardness, but they need to be in the ballpark of one another. Sometimes, you might even have some extra brittle stones in a batch of the same hardness. These will need to be pulled out and sorted separately. You can then tumble the extra brittle batch without any other stones. That way, you don’t lose out on any rocks, but you also don’t mess up a whole batch because of some brittle stones. The National Park Service provides an overview image below, of some common minerals compared to everyday objects on the right.
One thing to keep in mind, are how the stone types behave in the tumbler. For example, Apache Tears, and Obsidian are both forms of glass from volcanoes, but they react differently in the tumbler and will need to be tumbled at different times. If you’re just starting out, don’t worry too much about this. This is the kind of knowledge that comes with experience and it’s just a little extra nuance that shouldn’t stop you from starting your rock tumbling journey.
Types of Rocks To Tumble
If you are a beginner, I recommend starting out with easier rocks to tumble that will provide consistent great results without a lot of expertise. Some of these varieties include agates, flint, and jaspers. The common thing to look for in a beginner stone is a hardness of around 7 or so. These quartz rocks fall into that category. With this level of hardness, any beginner mistakes you might make will be forgiven by these tough stones.
Size Up The Stones
The rocks should be around a half inch or 1.3 centimeters to one and a half inches at the biggest spot. Anything bigger will need to be broken down with a hammer or chisel (note – be sure to wear eye protection when breaking rocks). One method of breaking rocks is to use a hammer and chisel with a plate made of steel. You put the plate on a padded surface like several pieces of paper for example, in order to soak up some of the hammer’s blow. Wearing the appropriate protective gear (i.e. eye protection and gloves) you’ll then use the chisel to crack the rock. Not all rocks will have them, but a fracture line on the rock is a good place to start. Inspect the rock for this line and then place the chisel there. Give it a good sharp strike and it should break apart fairly easily.
If the rock only cracks, subsequent lighter strikes can help it along until it comes apart.
While you’ve donned your own protective gear, also keep those around you in mind. Anyone standing around you should be back away and also in protective gear. Rock fragments can fly a long way and easily cause damage to a person’s eye.
Washing The Stones
Once you’ve cracked the larger stones into smaller more uniform pieces, be sure to wash them thoroughly. In fact, that is a required step for all of your stones, whether you cut them first or not. Use a stiff brush to get out any and all stubborn dirt and rock chips. You want a nice uniform surface as free from contamination as possible. Any impurities will impede the action of the grit you are using and cause the finished product to be inconsistent.
Inspecting the Rocks Prior to Tumbling
While washing your rocks, you can also inspect them for any cracks or issues that will be brought out during the tumbling process. If a rock is cracked, the tumbling action could cause it to break apart in the tumbler and mess up a whole batch. A good strong flashlight is useful for inspection as well.
If you find rocks that are cracked, set them aside for suture manual work. You may be able to break them up and clean them for use in a different batch.
Another thing to check for is excessive pitting or sponge like areas in your rocks. These pits will cause abrasive to get trapped in them and they won’t polish well. These will need to be thrown out. Any tiny pieces and chips will need to be discarded as well and only uniform size rocks should remain.
Write Down Your Data
One thing that is helpful to do at the beginning of the tumbling process is to make a log sheet to track all of your data for the batch. This is something a lot of beginners fail to do and wish they had done it after the process is complete. The more batches of rocks you tumble, the more data you will have. After awhile, you will be able to look back over your log sheets and have a lot of knowledge to make each new batch that much more professional looking and consistent. This is how experienced rock tumblers develop their own rock tumbling secret sauce.
You data will come in handy for things like the amount of abrasive that works best in your tumbler, fill level of the tumbler, and polishing quirks for each type of rock in your particular rock tumbler.
The Next Step – The Rough Grind
The First Grind Towards A Polished Stone
They always say “the first step is the hardest”. That is even true when learning how to polish rocks! The first grinding step to tumbling rocks into polished stones is known as the rough grind since it involves the roughest and consequently, the most abrasive of the rock tumbler grit media. In this section, we’ll go over the steps needed to make a successful rough grind and get your rocks on their way to becoming a beautiful polished stones.
Filling The Tumbler And Adding The Rock Tumbling Grit
Depending on your tumbler size, you’ll fill it around 2/3 or so full with your presorted rocks for tumbling. While the amount may vary depending on experience with your tumbler and rock type, you have to fill the tumbler at least halfway. This will ensure good action or tumbling motion for the rocks. Without a good amount of action, your stones won’t get a good grind from the abrasive. Once, you have the stones in the tumbler, remove them and check their weight. This will be used to calculate how much of the abrasive media to use.
Your particular abrasive should have instructions on rock weight to tumbling media amount, but a good rule of thumb for a rough grind is about .75 to one cup of abrasive for 9 pounds of rock. The rough grind is usually around an 80 grit level. With abrasives, the lower the number of the abrasive, the rougher the grind will be. For example an 80 grit level is much rougher and a more abrasive tumbler media than say a 200 grit level.
When adding the abrasive to the stones in the tumbler, be sure to tap the sides of the tumbler to get the abrasive down around all of the rocks. It is also a good idea to add in a dash of baking soda to help neutralize any buildup of gasses.
Using Filler Media In Your Rock Tumbler
If you sorted your rocks properly and they are of a uniform size, you may need a filler to help the abrasive get in between the stones during the rock tumbling.
What happens is that uniform sized stones tend to stick together and not get ground down on all edges. Uniform size is good because it will allow you to have a consistent product, but the filler is necessary to get a good grind on all edges.
At this point you need to add enough water to just at the rock level. You want the water at the top but not over the rocks completely. In time, you will learn what works best for your tumbler, but this is the best starting point.
Cranking Up Your Rock Tumbler
When the drum is finally full of stones, media, and water, you can seal it all up and crank up the tumbler. The first time you do this it is very exciting! However, it is a journey of patience so be sure to let it run without being disturbed for a t least 24 hours. After the first day, you will want to check it to check the progress and make sure you are getting a good action on the stones.
After 72 hours or so, you should hear a change in the sounds coming from the tumbler. The rough clacking that starts off will fade to a watery swoosh as the stones start the grind down. This is a good thing and means you are on the right path to a good grind. It will take about 1 week to get a good rough grind; but you may want to check the progress every 48 hours or so in order to make sure the stones are getting good action and also to release any gas buildup.
Troubleshooting Your Stones’ Rough Grind
One thing to keep in mind is that if you ever have to stop the process (lose electricity or something) you might have to completely remove and wash the stones for a fresh restart. What happens is that if the process is stopped for too long, the abrasive will dry and clump and become ineffective and a real bear to clean. You should only have to do this if the batch gets stopped for a few hours or more.
Warning – Disposing Of Rock Tumbler Grit Slurry
If you have to do this, make sure to never dump the abrasive material down an open drain. You will need to dump it into a container and let it dry. Then, break it up and discard it. When the abrasive dries, it gets very hard and can completely ruin your plumbing. This is not a mistake you want to ever make.
Be sure to carefully wash off the stones before you start them in a fresh abrasive restart (if you have to). You don’t want dried abrasive sticking to the stones and causing them to have missed grind spots after the rough grind is complete.
Post Rough Grind Cleaning
After a successful rough grind, remove the stones and wash them of all abrasive. Again, as in the previous paragraph, never do this over plumbing. Do this in a container where you can let the abrasive dry and be disposed of properly.
Make sure to get ALL of the abrasive off of the stones. You do not want any of the rough abrasive to contaminate the next steps. In addition, you need to inspect the stones for both a good uniform rough grind surface and for any cracks that weren’t revealed before grinding. If any stones are found to be cracked, they will need to be removed from the batch and split as in the initial inspection step. Don’t get discouraged about having to remove these stones from your batch. It’s all a part of the journey to a great set of polished stones.
If a lot of the stones have an inconsistent grind, or areas that didn’t get ground, you will have to put them through a new rough grind process. There is no way to polish just one area of the stones.
Once the stones are finished with inspection and cleaning, set them aside to completely dry. Once they are dry, inspect them again. Sometimes cracks that are hidden by the water will show on a dry stone. Once this is complete, you’ll be ready for the next step, the medium or intermediate grind!
One Of The Most Important Rock Tumbling Steps
Rock tumbling is a project of patience. The more meticulous you are in the steps, the better the finished product. In this section we’ll go over the medium grind and discuss the steps needed to get your stones on their way to being finely polished gems. Skip or rush this step and the final product is sure to suffer.
After the first grind, or rough grind, the stones will take on a hazy appearance when dried off. All sharp areas should be gone and you should have already done a good inspection both wet and dry to make sure there are no cracked or unevenly ground stones in your batch. Any rocks with issues should be removed from the batch so as not to contaminate the medium grind.
Keeping Your Tumbler Full
Since you are inspecting and removing stones that are not up to par, you may find that you don’t have enough rocks to fill your tumbler to the best level for optimum performance and tumbling action. In this scenario, you’ll need to use fillers. Plastic filler pellets make great filler and can be added to bring your batch up to the proper fill level. In addition, you’ll be adding a cup of your medium abrasive grit. This is usually around 320 to 400 grit abrasive. Much finer than the rough grind, but not a polishing or fine grind abrasive by any means.
Once you have your stones and filler in the tumbler, again you’ll add water to fill the tumbler up to the top of, but not covering the stones. Seal it all up and you’re ready to tumble!
The medium grind is usually run for around a week. Again, like the rough grind, you’ll inspect after the 1st day to make sure everything is coming along and also to release gas. Don’t forget to add a little baking soda to deal with gasses in the batch as well. If you have any issues with the abrasive slurry, for example if it is either too thick or thin, add water or abrasive to bring it up to snuff. Over time you will get a feel for the perfect thickness for your stone slurry and your particular rock tumbler and current media. In the beginning though, remember a good enough mix that gets completed is way better than a perfect mix that never gets started. Get that rock tumbler tumbling and learn as you go.
How To Polish Rocks – Using a Double Tumbler
After you gain some experience, you may want to do your rough grind in two tumblers. When doing this, you gain the advantage of being able to have enough stones to do a good medium grind without any filler after removing any stones with issues. Of course, this can also mean you are left with too many stones for a single tumbler in the medium grind. You can always set some stones aside and use them in the next set of medium grind you need at a future date. Be sure to store the stones in a container with a label stating exactly what they are ie. rough ground jasper for example. That way you know in the future that these are ready for a medium grind when you have room for them in a batch that is of a similar hardness.
After the Medium Grind
At the end of the week, stop the tumbler and remove the stones. Like with the rough grind, you will want to thoroughly wash and remove all abrasives from the stones. It can’t be stated enough that this is only to be done over a container to catch the grit and abrasive slurry. Never do this over a sink as the slurry can greatly damage the plumbing. This warning cannot be repeated enough. You don’t want to get careless because the price you pay will be a hefty one.
All stones need to be cleaned until no abrasive remains and then inspected for consistent grinding and cracks. You should have fewer issues in a medium grind but it is still a good idea to check and remove any cracked stones. You may find some chipped stones and these can be put into a new medium grind to resolve the issue.
Examples Of Stone Issues To Watch Out For
Large chips in stones will mean they will either have to be tossed out or put through a new rough grind.
Inconsistent polishing from poor tumbling action will also necessitate the need for a whole new medium grind session. There is no way to partially polish a stone that has spots with the grind missing.
If you used any filler material such as plastic buttons then now is the time to wash those as well. Thoroughly remove all abrasive, dry, and set aside for use in the future. These can be used again with no issues.
Be sure to check the stones after they are dry as well. Sometimes, a wet stone can hide chips or especially cracks.
Get Ready To Put A Fine Grind On Your Stones
Once you have all of your stones thoroughly cleaned and free of abrasive, you can get ready to move on to the final fine grind. You’ll be much closer to the finishing line and the stones should be taking shape at this point.
The Rock Polishing Home Stretch
While rock tumbling is a test of patience, and that is part of the attraction for some, it is nice to get to the end and start to see the finished product. The Fine Rock Polishing Grind is one of the last steps in rock tumbling a batch of rocks. It is only followed by polishing and it is the first time a rock tumbling hobbyist will start to see the light at the end of the tunnel and the payoff for all the patience.
However, it is still possible to get things wrong that can make or break your entire batch. For that reason, we’ll go over the steps involved in the find grind and set you on the right track to beautiful polished gemstones.
Once the medium grind is done and the stones have been inspected, it is time to prepare them for the fine grind. Load the tumbler with your rocks and add in your fine abrasive. For most rocks this will be an abrasive with a grit of around 550 – 600, much finer than any of the previous abrasives. While this abrasive may look like a powder, it is still a good cutting agent and will put the final tough on your stones.
Once again, as with the medium grind, if your tumbler is not filled up by the stones left in your inspected batch, you can use plastic filler to round out the mix and keep it tumbling correctly. Add enough filler to get the batch up to two thirds full in the tumbler, and then add your abrasive, baking soda, and a small amount of detergent to the mix. Add in your water to get the level of liquid to the top of the stones but not covering them completely.
Start your rock tumbler and let it run for 24 hours. After this time, you’ll want to check to make sure that the stones have been tumbling properly and that the slurry mix is a good consistency. If needed, add abrasive or liquid to get it to a good viscosity.
While the fine grind usually lasts a week, you’ll want to check some of the stones after a few days. Pull a couple out and see if they’ll take a polish by hand. Just grab some polish and a piece of heavy felt. If you have a burnishing wheel or polishing wheel, that can be used too. Add a small amount of polish and see if the stones will polish to a high gloss shine. You may need to add a little bit of water to the polish to get it to move with enough action over the stone. Be sure to use a firm hand. Do not worry about damaging the stone, as it is still very hard and there is not much you can do to hurt it by hand. If you did gouge it, you could always grind that out in a fine grind tumble anyway.
If the stones will take a good polish to a high gloss, the fine grind has done its job. If not, you’ll have to continue to run the fine grind until the stones will take a polish. After some experience, you’ll know how long that takes for each particular type of stone and your particular rock tumbler. Until that time though, it is ok to stop the tumbler every few days and check a few by hand to see when they are ready to take a good polish.
It is very satisfying to get to the end of this grind. At this point, you can actually see a finished product level of shine just by putting a hand polish on your stones. Congratulations on reaching this level. If however you have some issues and need to run them through a longer fine grind, do not worry. Remember patience is a big part of rock tumbling and the final result will come.
Polishing and Burnishing Gem Stones
The final step to creating high gloss gemstones in a rock tumbler is called (quite simply), polishing. You might ahve a step after that, known as Burnishing, but that is not true for all types of rock. We’ll go over burnishing in detail a little bit later.
Polishing your gemstones is one of the most exciting parts of the rock tumbling Journey. The ig payoff for the patience of tumbling rocks for days on end. This is the whole reason many get into rock tumbling in the first place. To see the final high gloss gemstone that started out as a rough rock.
Polishing, like all rock tumbling steps, takes a little bit of know how that comes with experience. In this piece, we are going to go over the ins and outs and help you to make your polishing step consistent and legendary among your rockhound buddies.
To get ready to polish your stones, make sure you’ve thoroughly dried them and inspected them from the fine grind you previously performed. You should have already gone over them to check for cracks, spalling (which is chipping around the edges of the stone), and any inconsistencies that would cause the stone to need to go back through a more abrasive grind or be thrown out altogether. Most can be reground through a fine grind batch and be salvaged. But, be sure to set them aside for now. Any stones with issues like pitting or chips will not take a good high gloss polish. Even worse, sharp edges could damage the other stones in your batch and cause all your work to go up in smoke.
Once you have your rocks together that are certified (by you) to be ready for polishing, go ahead and place them in your freshly cleaned tumbler. Some advanced hobbyists like to use a separate tumbler for each grind stage, but if you’re just starting out and only have one or two tumblers, just make sure it is completely clean before you start a new level of abrasive tumble.
A good polish to use for your stones is tin oxide. You’ll want around a half cup for 8 lbs. of stones. In addition to the polish, you’ll want to add one and a half cups of granulated sugar, and around a cup of soap flakes. These are the tricks of the trade for a good high gloss polish on your gemstones.
Check your level and if you need to add filler to get the tumbler at least half full, go ahead and do so. Once it is all buttoned up, start your rock tumbler.
you will want to check your stones every day or so. A good high gloss stone with a good polish will look as shiny dry as it does wet. Once you start to see this level of shine, your polishing is complete!
This typically takes 72 to 96 hours.
Burnishing – When Do You Need It?
Burnishing is an extra step you may need if you are working with stones that are on the softer side. It is also useful for stones that have crystalized areas such as lace agates or feldspars. These crystal pockets can trap polish and need a burnishing tumble to get the polish removed.
To perform a burnish, remove the stones from the polishing mix and wash them as you would for any other grind stage. Make sure they are thoroughly dried and do the same for your tumbler. A solid washing is needed after every stage where you are changing the level of the polish or grind.
To burnish the stones, you will set them up in the tumbler the same as the polish, but you will only add the sugar and soap flakes. No polish. The burnish will remove any leftover polish that is hard to get off of your softer stones and give these stones a final gloss that will amaze you.
At this point you will have gone through every level of grind stage in rock tumbling and should have a nice finished product. If this is your first batch it is sure to be a memorable one.
The “Size Up The Stones” para should read “…The rocks should be around a half inch or 13 millimeters to one and a half inches…”. One inch = 25mm.
Good Catch! I think I intended 1.3cm instead of 13 but you are right, 13mm is the same as 1.3cm and roughly a half inch.