
It’s not common for the average person to think of a rock when they think of something so nice they would display it in their home…. but that is just what you can do once you learn how to polish a rock… and the right rocks to use. Polishing rocks can be a great hobby that can turn rough, dull stones into beautiful, vibrant gems. Some rocks can even be made to look so interesting that they can even be valuable to some collectors. Don’t think that’s true…? You do know that a diamond is technically just a rock, right?
Polishing rocks does not have to be complicated. It involves just a few simple steps when you break it down. To start, you’ll need to use the right type of rock. Then you must prepare the rock and this involves both cleaning it and removing any rough edges. Finally, you’ll use a series of abrasives and polishing compounds to gradually smooth and polish the surface of the rock, unveiling its natural beauty. If you get it right, you’ll be left with a stunning new piece to display or turn into jewelry.
In addition, polishing rocks is one of the most relaxing hobbies because it strikes a good balance between hands off patience and focused fine detail work. In the process of polishing a rock, you can’t help but learn about geology and the different types of rocks in the world and even in your local area. If this sounds like something you’d be into, then read on because we’ll go over all the details to turn you into a rock polishing pro. With a little patience and practice, you’ll soon be creating beautiful, polished gems from rough, dull rocks.
Choosing the Right Rock to Polish
Most people don’t realize this, but not all rocks can or should be polished. Here are a few things to consider when choosing a rock to polish:
Hardness and Stability
Not all rocks are good for polishing. One thing that is a must is that the rock be the right hardness. Rocks that are too soft will crumble and stone that is too hard will not take a good polish. Some of the best rocks for polishing that fit this bill include agate, jasper, and quartz.
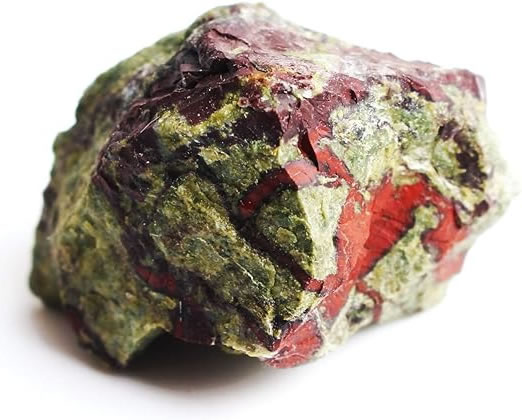
The Beauty In The Rock
Another factor to consider when selecting a rock for polishing, is the final look you want to achieve. Different rocks will produce different results. For example, agate is known for its colorful bands, while jasper can have a more earthy tone and more exotic rocks like Dragon’s blood have features like bright color streaks that make a truly stunning stone.
While a stone like Dragons Blood is slightly more exotic, here are some popular and more standard types of rocks for polishing:
- Agate
- Jasper
- Quartz
- Obsidian
- Amethyst
Finding Rocks to Polish
You can find rocks to polish in many places. Here are a few ideas to get you started:
| Location | Types of Rocks to You Will Commonly Find |
|---|---|
| Beaches | Agate, Jasper, Quartz |
| Rock Shops | Many Types of Rough Rocks |
| Nature Trails | Various types of rocks depending on Geolocation |
Remember to always ask for permission before taking rocks from private property, and to follow any rules or regulations in public areas.
Prepping Your Rock
Before you start polishing your rock, it is important to properly prep it. This will ensure that your rock is clean and smooth, which will make the polishing process more effective. Prepping your rock involves two main steps: cleaning your rock and smoothing rough edges.
Cleaning Your Rock
The first step in prepping your rock is to clean it. This is important because any dirt or debris on the surface of your rock can scratch it during the polishing process. To clean your rock, follow these steps:
- Fill a bucket with warm water and add a small amount of dish soap.
- Place your rock in the bucket and let it soak for 10-15 minutes.
- Use a soft-bristled brush to gently scrub the surface of your rock.
- Rinse your rock with clean water and dry it with a soft cloth.
Smoothing Rough Edges
The second step in prepping your rock is to smooth any rough edges. This is important because rough edges can also scratch your rock during the polishing process. To smooth rough edges, follow these steps:
| Tool | Description |
|---|---|
| Sandpaper | Use a coarse grit sandpaper to remove any large rough spots. |
| File | Use a metal file to smooth any smaller rough spots. |
| Dremel | Use a Dremel with a sanding attachment to smooth any hard-to-reach areas. |
After you have smoothed any rough edges, rinse your rock with clean water and dry it with a soft cloth.
Polishing Your Rock
Now let’s get down to business and talk about polishing the rocks. Polishing can turn a dull rock into a beautiful gemstone. Here are some tips and a rough guideline for polishing your rock:
Choosing the Right Polishing Compound
Before you start polishing, you need to choose the right polishing compound. There are different types of compounds available, such as aluminum oxide, cerium oxide, and diamond paste. Each compound has its own grit size, which determines how smooth the surface of the rock will be. In the beginning, choose a compound that is easily available (ie from a shop) and start with a coarse grit size. The shop can advise you on a good set of matching compounds that will complement each other throughout the stages of polishing. You can always move to a more custom approach later as you become more comfortable with the process and knowledgeable about the different variables involved in the end result.
Using a Rock Tumbler
If you have a rock tumbler, it can make the polishing process much easier and it is the go to standard piece of equipment when it comes to polishing rocks. Most polished rocks you see get that way by taking a trip through a rock tumbler. Place your rock and the polishing compound in the tumbler, with the proper amount of water and let it run for several hours. Check on the rock periodically to see if it needs more polishing at that current stage. Once the rock is smooth and shiny in the final stage, remove it from the tumbler and rinse it off with water.
Hand Polishing
If you don’t have a tumbler, you can still polish your rock by hand. Apply a small amount of polishing compound to a soft cloth and rub it onto the surface of the rock. Use a circular motion and apply light pressure. Keep adding more polishing compound as needed. Once the rock is smooth and shiny, rinse it off with water. This process is much more work and will never achieve the same results as using a rock tumbler, but it can be the right way to go depending on what it is you are trying to achieve. This is usually for someone that is limited on resources, or only needs a slight shine added to a mostly smooth stone.
Polishing your rock can be a fun and rewarding experience regardless of which way you go about it.
Finishing Touches
After you do most of the process with a tool like a rock tumbler, a Dremel, or completely by hand, it’s time to give your rock a final polish. This will help bring out the natural beauty and shine of the stone. Here are some tips for giving your rock the perfect finishing touches:
Buffing Your Rock
Buffing is the process of using a polishing compound to bring out the shine in your mostly polished rock. To buff your rock, you’ll need a polishing wheel or a buffing pad. Here are the steps:
- Apply a small amount of polishing compound to the wheel or pad.
- Hold your rock against the wheel or pad, applying light pressure.
- Move the rock back and forth, making sure to cover all sides.
- Continue buffing until you achieve the desired shine.
Sealing Your Rock
Sealing your rock will help protect it from scratches and other damage. It will also help enhance the color and shine of the stone. Here’s how to seal your rock:
- Clean your polished rock thoroughly with soap and water, and let it dry completely.
- Apply a sealer to the entire surface of the rock, using a small brush or sponge.
- Let the sealer dry completely, then apply a second coat.
- Let the second coat dry completely before handling your rock.
With these finishing touches, your rock will be ready to display or to use in jewelry making. Remember to always wear protective gear when cutting and polishing rocks (ie. safety glasses), and to follow all safety guidelines.
Troubleshooting
Polishing rocks can be mostly straightforward, but sometimes things don’t go as planned. Here are some common problems that can arise during the polishing process and some suggestions for how to address them:
Problem: Uneven Polishing
If you notice that your rock is not being polished evenly, there could be several reasons why. One possibility is that the rock is getting stuck in the tumbler, causing it to sit mostly to one side and receive uneven polishing. To fix this, try adding more filler material to the tumbler. Another possibility is that the grit is not being distributed evenly across the rock’s surface. To address this, try adjusting the amount of water and grit you are using to get the right consistency of slurry. It should be slightly thick but not too thick. Getting the right mix is sometimes the result of wisdom that comes form doing it multiple times. Don’t get frustrated if it isn’t perfect and you are just starting out in your rock polishing journey.
Problem: Scratches or Marks on the Rock
If you notice scratches or marks on your rock after polishing, it could be due to several factors. One possibility is that the rock was not cleaned thoroughly before beginning the polishing process, causing dirt or debris to scratch the surface. To avoid this, make sure to clean your rocks thoroughly before placing them in the tumbler. Another possibility is that the grit size is too coarse for the rock you are polishing. To address this, try using a finer grit or a different type of polishing compound. Finally, always make sure to clean out your rock tumbler thoroughly between grit stages. If you don’t get all of the coarse grit out after the first stage for example, it can carry over into the finer stages of polishing.
Problem: Rough or Dull Finish
If your rock is coming out of the tumbler with a rough or dull finish, it may be caused by one of a few things. One possibility is that you did not run the rock for long enough in the tumbler. To address this, try running the rock for a longer period of time. Another possibility is that the grit size is too fine for the rock you are polishing. To fix this, use a coarser grit or a different type of polishing compound.
Final Thoughts
Congratulations! You have successfully polished your rock and turned it into a beautiful piece of art. Remember, patience is key when polishing rocks. Take your time and enjoy the process.
Just to recap, the steps involved in polishing a rock are:
- Step 1: Choose the right rock
- Step 2: Clean the rock
- Step 3: Sand the rock
- Step 4: Pre-polish the rock
- Step 5: Polish the rock
- Step 6: Finish the rock
Now that you have a polished rock, you may be wondering what to do with it. Here are a few suggestions:
- Display it on a shelf or table
- Use it as a paperweight
- Give it as a gift
- Use it in a craft project
Polishing rocks can be a fun and rewarding hobby. I wish you the best on your rock polishing journey!
thanks, I will run them a little longer and see what happens.
Do you let the polish dry before buffing out the rock if doing the process with a dremel tool? Kind of like waxing your car.